Custom packaging sleeves work best when the base package already contains and supports the product. The sleeve then adds a printed surface, groups a defined set, or changes a collection's presentation. Its success depends on the finished package circumference, the assembly method, and the seam position—not just the artwork.
For beauty packaging, the important question is whether a sleeve can go on consistently and remain in the intended position through handling. A sleeve that looks precise in a mockup can still slide off, bow the box, or catch a corner during packing.
Choose between a sliding sleeve and a wraparound band
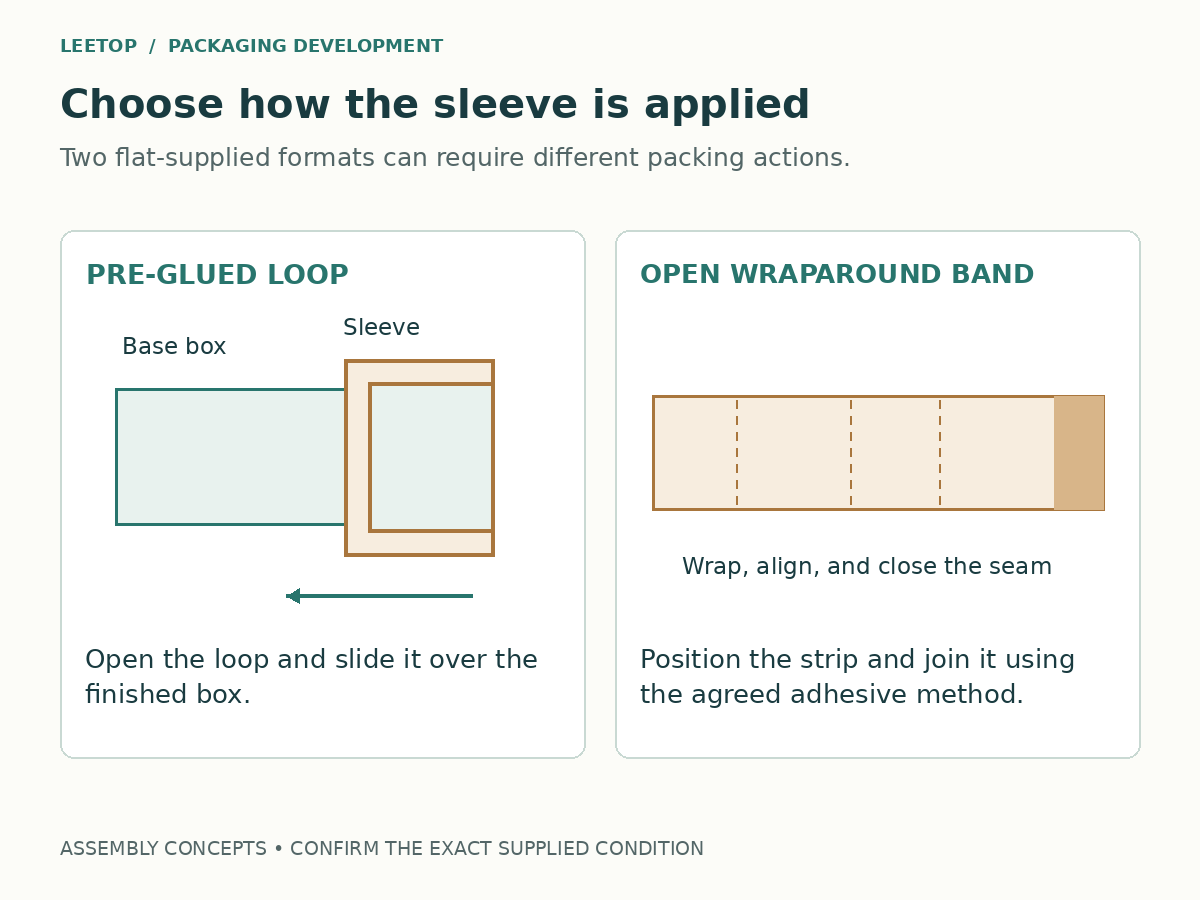
Suppliers use “sleeve” and “belly band” for overlapping products. Specify the supplied condition and assembly action rather than relying on the name.
A pre-glued sleeve that slides on
The supplier forms the glued loop. Your packing team opens it and slides it over the completed box. This makes the fit between the loop and the finished box central to the design.
Check the insertion end and seam location. A corner, lid overhang, textured wrap, or protruding label can interrupt the sliding path. Test the actual finished surface, not an unfinished box with the same nominal dimensions.
An open band wrapped around the box
The band arrives as a strip and is closed during packing, using the agreed adhesive method. It does not need to slide over the largest projecting feature, but the operator must place the overlap consistently.
Confirm whether adhesive is supplied, pre-applied, or added locally. Ask who controls the final circumference. A band assembled by hand can vary if the team has no reference for overlap and tension.
For example, VistaPrint's belly bands use a peel-and-seal assembly. That illustrates why “arrives flat” does not by itself tell a buyer whether a product is an open strip or a pre-glued sleeve. LEETOP's project specification should state the actual construction being quoted.
Measure the cross-section that the sleeve wraps around
Identify the sleeve's sliding direction on a photograph of the finished box. Then identify the two outside dimensions around which it wraps. Do not interchange the box length, sleeve width, and wrap length in the brief.
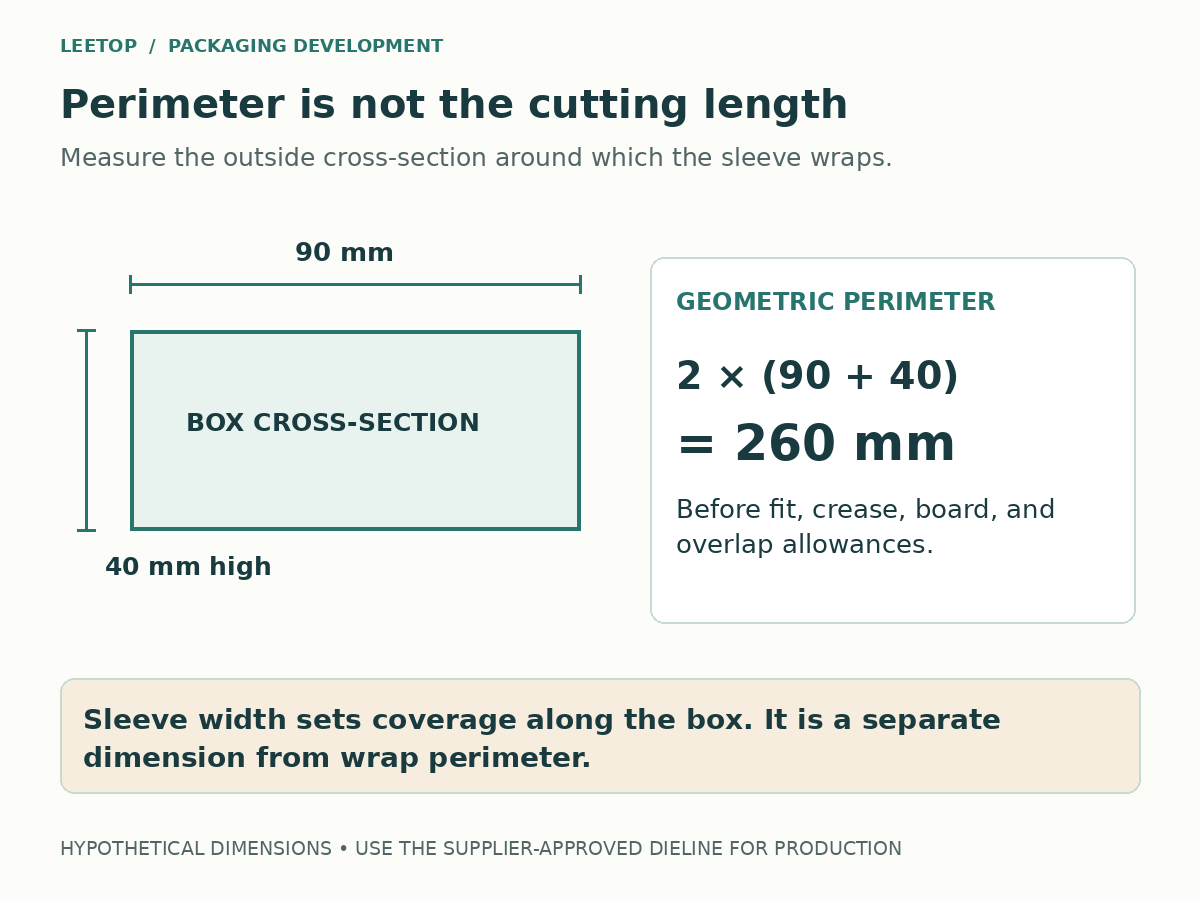
Consider an illustrative box with a 90 mm by 40 mm outside cross-section. Its geometric perimeter is:
2 × (90 + 40) = 260 mm.
That number describes the outside path around the box. It is not a production blank length. The converter still needs to account for the chosen board, creases, fit allowance, joining method, and glue overlap.
The sleeve width is a separate decision: it determines how much of the box is covered along the sliding direction. A 50 mm-wide band can have the same wrap perimeter as a much wider sleeve on the same box.
Send the box sample and ask the supplier to provide the finished sleeve specification and its matching dieline. Avoid taking a generic overlap or clearance from another printer and treating it as a universal rule.
Set a usable fit target
“Snug” is too vague to be the only approval instruction. Define what the packer and customer should be able to do.
- The sleeve should load through the intended end without crushing corners or scraping the approved finish.
- Its seam should remain closed during the agreed handling check.
- The sleeve should stay in its intended position under the handling conditions agreed for that project.
- The customer should be able to remove it as intended without an unplanned tear or a damaged base box.
These targets can conflict. A very tight loop may stay in place but be slow to apply. A loose loop may load easily yet move over a barcode or fall away when the box is picked up. The physical trial should reveal the trade-off before the print order is released.
For a repeat order, retain both the approved sleeve and the approved base box. A change to the base box wrap, construction, or outside size can change the fit even when the sleeve artwork stays the same.
Put the seam where it creates the fewest problems
The glue seam is a physical feature, not just an invisible line on the dieline. Ask which panel contains it and where the overlap edge faces during sliding.
Keep the seam away from the main viewing area when practical. Check whether the overlap creates a visible ridge, catches a box edge, or crosses important artwork. Adhesive and surface treatment need to be compatible with the selected construction; a screen proof cannot confirm the bond.
Also decide where the customer removes the sleeve. If the intended action is sliding, provide a usable grip. If it is tearing, develop and trial the opening feature deliberately. A normal paper band is not automatically a tamper-evident device.
Do not let the sleeve cover information the shopper or retailer needs while the item is offered for sale. Review the assembled pack, including any barcode or variant identification, in its intended shelf position.
Use sleeves where the base package can stay the same
An established skincare gift box might use a different sleeve for a seasonal campaign, language version, or retail bundle. The advantage is the ability to change the printed outer layer while retaining a qualified base package.
That flexibility has a boundary: the contents still have to fit. If a new bundle adds a taller pump or another jar, a new sleeve will not fix an unsuitable inner layout. Reassess the custom insert and base structure first.
Compare the complete costs of the two options you are actually considering. A sleeve adds material and application work if the existing box is already fully printed. It may simplify variant management, but it does not automatically reduce total cost or environmental impact.
Check one complete packing sequence
Trial the sleeve with a finished, filled box using the proposed assembly method. Observe the operator's starting grip, the point where the sleeve meets the first corner, the final printed position, and the customer removal action.
If the sleeve arrives open, record the overlap reference and adhesive step. If it arrives pre-glued, inspect the opened shape and seam before sliding. Sample several pieces to see whether the result is repeatable; one carefully adjusted presentation sample is not evidence of a consistent process.
Keep a short record of any scuffing, bowing, seam lift, movement, or assembly difficulty. Use that record to change the construction before spending time refining the graphics. Artwork can then follow the approved production-file workflow.
Questions about paper sleeves
Is a belly band cheaper than a full box?
A band uses a different amount of material and performs a different job. Compare the complete pack, including the underlying box and assembly. A band around an already printed box can cost more than the box alone.
Can a sleeve replace the product's protective box?
Only if the resulting construction has been developed for containment and support. An open-ended decorative wrap around a base box should not be assumed to provide the same functions as a complete carton.
Can I calculate the flat sleeve length myself?
You can estimate the geometric perimeter for a brief. The supplier should confirm the production dimensions, board and crease allowances, fit, and overlap through the dieline and physical sample.
Develop the sleeve around the real base box
Send LEETOP the completed base-box dimensions or sample, the intended sleeve direction, desired coverage, and preferred assembly method. Include the artwork, quantity, and delivery location. Start a packaging review so the sleeve and its base can be evaluated together.